Dienstag, 30. Juli 2013

Sobel Edge Detection - Part 2

In Edge Detection- fundamentals, we have seen how the first and second order derivatives are used in finding the edge strength. Now lets see another version of sobel edge detection.

Basic Steps followed in Sobel Edge Detection:

1.       Obtain the gradient of the image.
2.       Find the magnitude
3.       Threshold the gradient image.


SOBEL EDGE DETECTION USING ‘edge’ FUNCTION:

%Input Image
A=imread('coins.png');

%Image obtained using MATLAB function 'edge'
[E,th]=edge(A,'sobel','nothinning');
figure,imshow(E);title('Image obtained using MATLAB function')


Edge Detection without using the 'edge' function: 

MATLAB CODE:

%Input Image
A=imread('coins.png');

%Preallocate the matrices with zeros
I=zeros(size(A));


%Filter Masks
F1=[-1 0 1;-2 0 2; -1 0 1];
F2=[-1 -2 -1;0 0 0; 1 2 1];

A=double(A);


for i=1:size(A,1)-2
    for j=1:size(A,2)-2
        %Gradient operations
        Gx=sum(sum(F1.*A(i:i+2,j:j+2)));
        Gy=sum(sum(F2.*A(i:i+2,j:j+2)));
               
        %Magnitude of vector
         I(i+1,j+1)=sqrt(Gx.^2+Gy.^2);
       
    end
end


I=uint8(I);
figure,imshow(I);title('Filtered Image');


%Define a threshold value
Thresh=210;
B=max(I,Thresh);
B(B==round(Thresh))=0;

B=im2bw(B);
figure,imshow(B);title('Edge detected Image');


EXPLANATION:

1.       Read the image
2.       Convert the image to double
3.       Use the mask F1 for x direction and F2 for y direction and obtain the gradient of the image.
4.       Find the magnitude of the vector.
5.       Since we need 3x3 image pixels, the border pixels are not considered, and so starting from the pixel (2, 2) the edge detection process starts.
       %Magnitude of vector
    I(i+1,j+1)=sqrt(Gx.^2+Gy.^2);
    When i=1 and j =1, then Image I pixel position will be I(2,2).Thus we are not considering the borders.
Example:

    In the for loop 2 is subtracted.
"
for i=1:size(A,1)-2
    for j=1:size(A,2)-2 "
     The filter mask is 3x3, so the last position to be processed in our example is I(3,3).And normally it will be I(size(A,1)-2,size(A,2)-2). Thus the borders are left.

Example :


6.       Threshold the image
7.       Display the logical image


Advantage:

1. Sobel masks perform better noise suppression.

2. Image smoothing


Disadvantage:

1.       Diagonal direction points are not preserved always.

Freitag, 26. Juli 2013

Create Video with Sequence of Images


                   Have you ever tried to create Movie trailer of your favorite movie or playback of your favorite pictures?  Here let’s create one. Let’s try to create a Movie trailer, a simple one.
Store all the images that are needed to create your video in a folder.
There are two methods to create a video file.  First method is creating video with array of Images and the second method is write one frame at a time to the video file.

Method 1:

Read all the images into an array and write to the video file.

MATLAB CODE:

%Create Video with Image Sequence
clear all
clc
%Make the Below path as the Current Folder
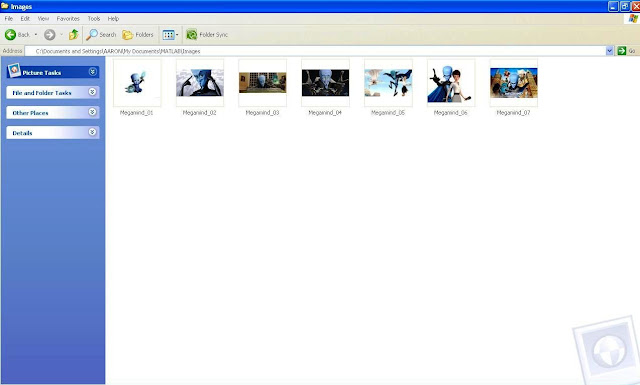
cd('C:\Documents and Settings\AARON\My Documents\MATLAB\Images');

%Obtain all the JPEG format files in the current folder
Files = dir('*.jpg');


%Find the total number of JPEG files in the Current Folder
NumFiles= size(Files,1);

%Preallocate a 4-D matrix to store the Image Sequence
%Matrix Format : [Height Width 3 Number_Of_Images]
Megamind_Images = uint8(zeros([600 1000 3 NumFiles*5]));

%To write Video File
VideoObj = VideoWriter('Create_Video.avi');
%Number of Frames per Second
VideoObj.FrameRate = 5; 
%Define the Video Quality [ 0 to 100 ]
VideoObj.Quality   = 80;  


count=1;

for i = 1 : NumFiles
  
   %Read the Images in the Current Folder one by one using For Loop
   I = imread(Files(i).name);
  
   %The Size of the Images are made same
   ResizeImg = imresize(I,[600 1000]);
  
   %Each Image is copied 5 times so that in a second 1 image can be viewed
   for j = 1 : 5
     Megamind_Images(:,:,:,count)=ResizeImg;
     count = count + 1;
   end
 
end

%Open the File 'Create_Video.avi'
open(VideoObj);


%Write the Images into the File 'Create_Video.avi'
writeVideo(VideoObj, Megamind_Images);


%Close the file 'Create_Video.avi'
close(VideoObj);


EXPLANATION:

1. %Make the Below path as the Current Folder
      cd('C:\Documents and Settings\AARON\My Documents\MATLAB\Images');

               The ‘cd’ command is used to make the given path as current folder.
               When you execute the above command, you can find the current folder changed to the path specified in the above command.
2. %Obtain all the JPEG format files in the current folder
        Files = dir('*.jpg');

                   The ‘Files’ variable contains metadata.
>> Files(:).name

ans =

Megamind_01.jpg


ans =

Megamind_02.jpg


ans =

Megamind_03.jpg


ans =

Megamind_04.jpg


ans =

Megamind_05.jpg


ans =

Megamind_06.jpg


ans =

Megamind_07.jpg


3. %To write Video File
VideoObj = VideoWriter('Create_Video.avi');

Mention the Video file name

4. %Number of Frames per Second
VideoObj.FrameRate = 5; 

Five frames will be played in 1 second.


5.  ‘NumFiles’ contain number of JPEG images in the current folder.
In our example, the number of JPEG images is 7.
>> NumFiles

NumFiles =

     7

6.  Read the first Image using ‘Imread’ function.
7.  Resize the image to a size of your choice. See that you resize all the images to a constant size.
8.  If we use only these 7 images then the video will be played within 1.4 seconds. And you may not be able to view the images in the video. So in order to make all the images viewable for certain time, each frame is replicated 5 times.
9.  The Number of Frames per second is 5. Since each image is replicated for 5 times, one image will be seen per second. Therefore, our video will run for 7 seconds with 7 Images * 5 repetition = 35 Images.


10.Store these 35 images in a matrix.
   Images(:,:,:,count)=ResizeImg; 
11.Finally, open the video file and write the image matrix and close the file.

METHOD 2:


In the previous method, we wrote the entire 35 images stored matrix to the video file at once. Here we are going to read the image, convert to movie frame and write it one by one to the video file.

MATLAB CODE:


%Create Video with Image Sequence
clear all
clc

%Make the Below path as the Current Folder
cd('C:\Documents and Settings\AARON\My Documents\MATLAB\Images');

%Obtain all the JPEG format files in the current folder
Files = dir('*.jpg');

%Number of JPEG Files in the current folder
NumFiles= size(Files,1);


%To write Video File
VideoObj = VideoWriter('Create_Video01.avi');
%Number of Frames per Second
VideoObj.FrameRate = 5; 
%Define the Video Quality [ 0 to 100 ]
VideoObj.Quality   = 80;  

%Open the File 'Create_video01.avi'
open(VideoObj);

for i = 1 : NumFiles
   
   %Read the Image from the current Folder
   I = imread(Files(i).name);
  
   %Resize Image
   ResizeImg = imresize(I,[600 1000]);
  
   %Convert Image to movie Frame
   frame = im2frame(ResizeImg);
  
   %Each Frame is written five times.
      for j = 1 : 5
          %Write a frame
          writeVideo(VideoObj, frame);
      end
 
end


%Close the File 'Create_Video01.avi
close(VideoObj);


EXPLANATION:


1.  After reading the image from the current folder, convert the image to movie frame using ‘im2frame’ function.
2.  Write the frame to the file and read next image and repeat the process of converting and writing to the file till the last image is processed and written.




Montag, 22. Juli 2013

FACE DETECTION - MATLAB CODE

                                  Lets see how to detect face, nose, mouth and eyes using the MATLAB built-in class and function. Based on Viola-Jones face detection algorithm, the computer vision system toolbox contains vision.CascadeObjectDetector System object which detects objects based on above mentioned algorithm.
  
Prerequisite: Computer vision system toolbox

FACE DETECTION:

clear all
clc
%Detect objects using Viola-Jones Algorithm

%To detect Face
FDetect = vision.CascadeObjectDetector;

%Read the input image
I = imread('HarryPotter.jpg');

%Returns Bounding Box values based on number of objects
BB = step(FDetect,I);

figure,
imshow(I); hold on
for i = 1:size(BB,1)
    rectangle('Position',BB(i,:),'LineWidth',5,'LineStyle','-','EdgeColor','r');
end
title('Face Detection');
hold off;


The step(Detector,I) returns Bounding Box value that contains [x,y,Height,Width] of the objects of interest.


BB =

    52    38    73    73
   379    84    71    71
   198    57    72    72

NOSE DETECTION:


%To detect Nose
NoseDetect = vision.CascadeObjectDetector('Nose','MergeThreshold',16);


BB=step(NoseDetect,I);


figure,
imshow(I); hold on
for i = 1:size(BB,1)
    rectangle('Position',BB(i,:),'LineWidth',4,'LineStyle','-','EdgeColor','b');
end
title('Nose Detection');
hold off;


EXPLANATION:


To denote the object of interest as 'nose', the argument  'Nose' is passed.

vision.CascadeObjectDetector('Nose','MergeThreshold',16);

The default syntax for Nose detection :
vision.CascadeObjectDetector('Nose');

Based on the input image, we can modify the default values of the parameters passed to vision.CascaseObjectDetector. Here the default value for 'MergeThreshold' is 4.

When default value for 'MergeThreshold' is used, the result is not correct.
Here there are more than one detection on Hermione.


To avoid multiple detection around an object, the 'MergeThreshold' value can be overridden. 


MOUTH DETECTION:


%To detect Mouth
MouthDetect = vision.CascadeObjectDetector('Mouth','MergeThreshold',16);

BB=step(MouthDetect,I);


figure,
imshow(I); hold on
for i = 1:size(BB,1)
 rectangle('Position',BB(i,:),'LineWidth',4,'LineStyle','-','EdgeColor','r');
end
title('Mouth Detection');
hold off;


EYE DETECTION:


%To detect Eyes
EyeDetect = vision.CascadeObjectDetector('EyePairBig');

%Read the input Image
I = imread('harry_potter.jpg');

BB=step(EyeDetect,I);


figure,imshow(I);
rectangle('Position',BB,'LineWidth',4,'LineStyle','-','EdgeColor','b');
title('Eyes Detection');
Eyes=imcrop(I,BB);
figure,imshow(Eyes);


Cropped Image


I will discuss more about object detection and how to train detectors to identify object of our interest in my upcoming posts. Keep reading for updates.

Donnerstag, 18. Juli 2013

Image Sharpening using second order derivative –(Laplacian)


Prerequisite: Read EdgeDetection- fundamentals

The derivative operator Laplacian for an Image is defined as


For X-direction,

For Y-direction,


By substituting, Equations in Fig.B and Fig.C in Fig.A, we obtain the following equation


The equation  represented in terms of Mask:
0
1
0
1
-4
1
0
1
0

When the diagonals also considered then the equation becomes,


The Mask representation of the above equation,
1
1
1
1
-8
1
1
1
1

Now let’s discuss further how image sharpening is done using Laplacian.

Equation:
Where f(x,y)  is the input image
              g(x,y) is the sharpened image and
               c= -1 for the above mentioned filter masks.(fig.D and fig.E)

MATLAB CODE:

%Input Image
A=imread('coins.png');
figure,imshow(A);


%Preallocate the matrices with zeros
I1=A;
I=zeros(size(A));
I2=zeros(size(A));

%Filter Masks
F1=[0 1 0;1 -4 1; 0 1 0];
F2=[1 1 1;1 -8 1; 1 1 1];

%Padarray with zeros
A=padarray(A,[1,1]);
A=double(A);

%Implementation of the equation in Fig.D
for i=1:size(A,1)-2
    for j=1:size(A,2)-2
       
        I(i,j)=sum(sum(F1.*A(i:i+2,j:j+2)));
       
    end
end

I=uint8(I);
figure,imshow(I);title('Filtered Image');


The Laplacian derivative equation has produced grayish edge lines and other areas are made dark(background)

%Sharpenend Image
%Refer Equation in Fig.F
B=I1-I;
figure,imshow(B);title('Sharpened Image');


The Filter Image is combined with the Original input image thus the background is preserved and the sharpened image is obtained .


For a Filter Mask that includes Diagonal,


1
1
1
1
-8
1
1
1
1

Filtered Image:


Sharpened Image: